What are Rafters? its 7 Types, Construction Steps & Advantages
The rafters are a series of sloped structural pieces that will extend from a ridge area to the plate of a wall and support the load of the building and is a structural component of a pitched roof.
The rafters are used as part of roof construction and generally laid in series, side by side, providing a base to support roof decks, roof coverings, etc. Rafters are made of timber or steel and can be concealed within the roof structure, and to fix the roof covering, they may have battens laid on top and perpendicular to them.
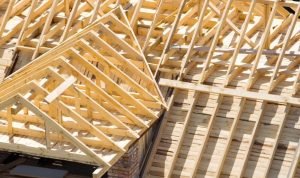
As a key component of various roof design types, rafters can be used, and each rafter is built on the job site using dimensional lumber; and the rafter, every piece is measured, cut, and fastened together.
The most common form of the rafter is known as the fink, or ‘we trussed rafter in modern house construction.
How to Build the Rafters?
There are the following steps to build the rafters as given below;
- Mark & Cut the First Rafter Ends
- Mark & Cut the Seat and Birdsmouth
- Make Set of Rafters From the First Rafter
- Make the Rafter Jig
- Install the Gusset of First Rafter
Mark & Cut the First Rafter Ends:
The first step to build the rafter is to cut one rafter board to length with the ends angled properly. Then to mark and cut the bird’s mouth and a seat on the rafter and to the angle of the roof slope, the ridge end and often the eve end of the rafter will need to be cut.

To make an 18 and one-half degree angle on the board ends, the roof on this shed should be 4 in 12 slopes. To the long point measure from the eve end of the rafter board, that will be the ridge of the rafter.
Mark & Cut the Seat and Birdsmouth:
The second step will be to mark and cut out the horizontal seat and bird’s mouth, and the horizontal cut is called the seat, while the vertical cut is called the bird’s mouth. To start the vertical bird’s mouth, measure from the eve end of the rafter and place a mark.
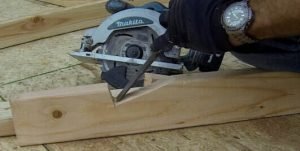
To placemarks across the board on the two points, use the square, mark the birdsmouth angle; place the pivot point of the square where the birdsmouth mark connects the edge of the board.
Flip the square over and place the pivot point where the seat mark meets the board’s edge to mark the seat cut and then to the birdsmouth depth line, mark a line from that point. Then to its deepest cut setting, set your circular saw and cut along the seat lines and birdsmouth.
Make Set of Rafters From The First Rafter:
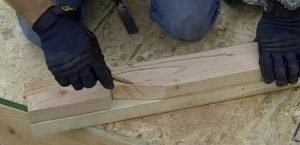
In this step, to make two more rafters use the first rafter and place the first rafter on the second and third boards and then onto the second board, trace the bird’s mouth, seat, and ridge angles. Cut the second and third rafters out and prepare them.
Make The Rafter Jig:
This step is to build a temporary jig on the shed floor to support the building by making a line on the exact center of the floor, and then the overall height of the rafter assembly is marked from the edge of the shed floor and on the rafter plans, this measurement will found.
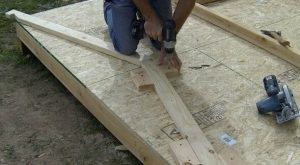
At the ridge, the rafter ridges should be fully touching each other along the cuts, and along with the entire cuts, the seats should be flush with the edge of the shed floor. By one-half of an inch, each rafter should be overhanging the edge of the shed floor.
Ensure that the rafter is in its exact position and snug up against the rafter edges.
Install The Gusset on The First Rafter:
In this step, to attach the two rafters, make a rafter gusset and make sure that the gusset does not extend above the top edges of the rafter. Then by using nails, nail the gusset to the rafters, and along the edges of the gusset, place a nail every three inches.
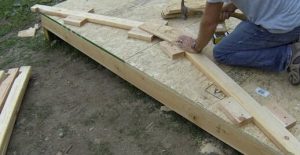
On both sides of all the rafters, install the gussets, stand them up, and line them up with the edges of the shed floor to test the rafter assembly.
Types of Rafters:
There are the following types of rafters such as;
- Common Rafter
- Hip Rafter
- Hip Jacks
- Valley Rafter
- Valley Jacks
- Cripple Jacks
- Flying Hip

Common Rafter:
A common rafter is found in all conventionally framed roofs and run from an exterior wall up to the ridge board and is used to set the center of the ridge board in the span and height.
This rafter is located between the principals at both ends, and the hip and valley rafters location can be established after the ridge board location has been established.
Hip Rafter:
This rafter runs at a 45-degree angle to the commons and the ridge board. These are placed from the outside corners of the building.
For the corners of a hip roof, these are used.
Hip Jacks:
This sits on the outside walls and with the common rafters run up to the hip rafter in line.
Valley Rafter:
Valley rafter is placed inside corners to the ridge, and at a 45-degree angle and the lowest point of a valley roof, this rafter is found.
Valley Jacks:
These jacks run from the valley rafter up to the ridge board and line with the commons.
Cripple Jacks:
When a valley and hip are located close together, cripple jacks are used and go from a valley to a hip rafter.
Flying Hip:
Flying hip goes from where a valley rafter meets a ridge to the end of a higher ridge board and is known as a mystery hip.
Advantages of Rafters:
There are the following advantages such as;
- If you need a lot of empty room up there for storage, rafter construction is best for it.
- To include a specialized ceiling design like a vaulted or a cathedral-style ceiling, the rafters are suitable then.
- Less advanced planning is needed because rafters are stick-built on-site at the time of need.
- At the job site, these take a tremendous amount of time to install.
